This package consumes:
atom-pyocd - pyOCD integration for Atom
This package allows you to flash your mbed / DAP-link device from within Atom using pyOCD. It is meant as an extension to the build-med to allow flashing the results from the mbed-cli build process.
Features
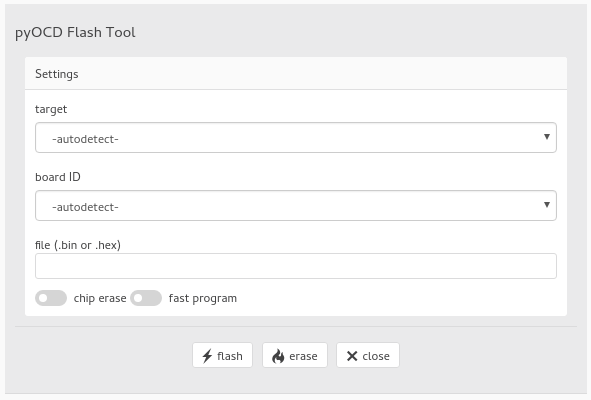
- Configuration dialog to configure target file, board ID etc. on per project basis (configuration is written to
pyocd_settings.json). - Flash
.hexor.binfile - Erase flash
Prerequisites
In order to use this package, pyOCD needs to be installed on your machine. For details on how to install pyOCD see the instructions. On a typical Linux system the following command should to the trick:
sudo pip install --pre -U pyocd
Please note, that pyOCD needs Python 2.7. Thus if your default Python interpreter is 3.0 you might need to substitute pip with pip2.
To access the DAP-link interface as a normal user, it is very likely that you need to add a udev rule. This rule is board specific, but typically it looks something like this:
# mbed CMSIS-DAP
ATTRS{idVendor}=="0d28", ATTRS{idProduct}=="0204", MODE="664", GROUP="plugdev"
KERNEL=="hidraw*", ATTRS{idVendor}=="0d28", ATTRS{idProduct}=="0204", MODE="664", GROUP="plugdev"
Put the rule into /etc/udev/rules.d/99-daplik.rules and restart udev with:
sudo udevadm control --reload-rules
Installation
To install this package from the package repository:
apm install pyocd
Or install from git:
cd $HOME/$MY_GIT_REPOS
git clone https://github.com/wendlers/atom-pyocd
Change into the newly cloned directory and link the package into your atom install:
cd atom-pyocd
apm link
Next, install required node packages:
apm install
Now, when you start your atom next time, you might be asked to install the some dependencies.
Usage
Quick Start
- Connect your board
- Open a project for your board in Atom. Compile it to a
.hexor.binfile (if you use mbed-cli and like to compile directly from Atom, you might want to try the build-med package). - Configure pyOCD for your project by opening the pyOCD panel with
shift+alt+p(or from right click menu and selectingpyocd: toggle). - In the configuration panel at least specify a
targetand afile. - Now hit
flashor pressshift-alt-sto flash your board. - Flashing progress is indicated by the spinning busy indicator in the right bottom corner.
- Depending on your board, you might need to manually reset it after flashing to make your program run.
Configuration Parameters
The following could be set in the pyOCD panel:
- The
targetMCU - The
board IDwhich is only needed if you have more than one board connected. - The
fileto flash. Could be a .bin or .hex file. - If the
chip eraseswitch is turned on, a full chip-erase will be performed when flashing, else only a sector erase will be done (switches-ceand-seofpyocd-flashtool). - If the
fast programswitch is enabled, only the CRC of each page to is used to determine if it already has the same data (-fpswitch ofpyocd-flashtool).
In the package settings the following could be configured:
pyocd-flashtool binary: name and optional path for the flashtool which comes with pyOCD.
Available Functions
The following functions could be performed (from the pyOCD panel,the menu, the context-menu or by keyboard shortcut):
- toggel pyOCD panel (
shift+alt+p): open the pyOCD panel - flash (
shift-alt-s): flash specified file - erase (
shift-alt-e): erase chip